
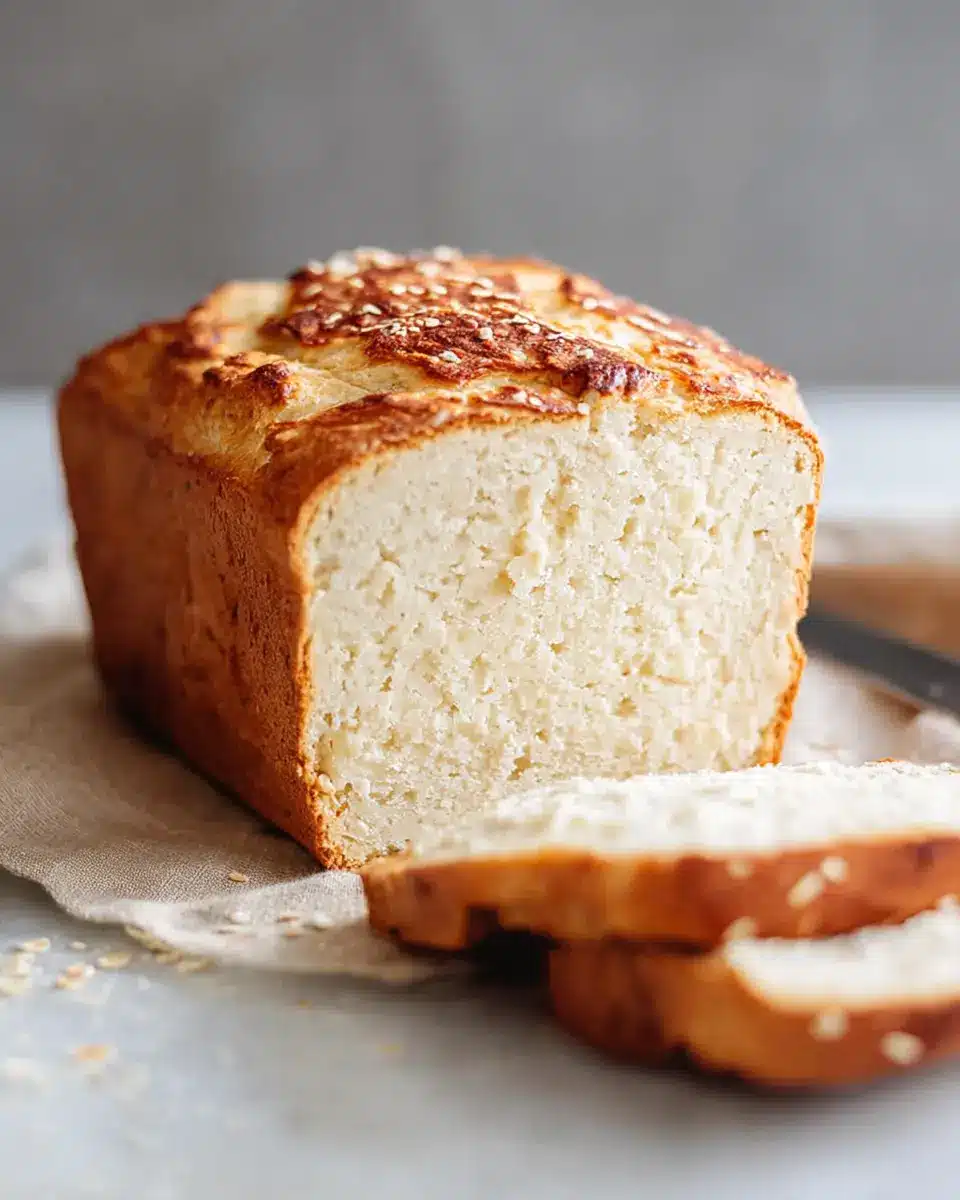
Introduction to Easy Gluten Free Bread Recipe
Baking homemade bread can seem daunting, but the satisfaction of pulling a warm, golden loaf from your oven makes it all worthwhile. An easy gluten free bread recipe allows you to enjoy the comforting aroma and taste of fresh bread without the gluten. This recipe is not just about nourishment; it’s a simple way to bring joy into your kitchen!
Why is homemade gluten-free bread worth the effort?
Making gluten-free bread at home means you control the ingredients. You can choose high-quality, wholesome items that suit your dietary preferences, making it a healthier option compared to store-bought alternatives. Plus, many gluten-free options in stores can be dense or lacking flavor, while this easy gluten free bread recipe offers a soft, tender texture that rivals traditional bread.
Homemade bread also invites creativity. Add your favorite seeds or herbs to the mix for a personalized touch. Plus, the process of kneading your dough, watching it rise, and savoring the smell as it bakes can be a therapeutic experience. Don’t forget, this homemade delight provides significantly better taste and texture compared to pre-packaged alternatives, so gather your ingredients and let’s get baking!
For more valuable insights about gluten-free ingredients, check out resources like GF Journal which offers fantastic tips on gluten-free living.
Ingredients for Easy Gluten Free Bread
Essential Pantry Items for Gluten-Free Baking
To whip up an easy gluten free bread recipe, you'll want to stock your pantry with a few essential items. These are the backbone of your bread-making adventure:
- Gluten-Free All-Purpose Flour: Choose a high-quality blend designed for yeast breads, such as King Arthur Gluten-Free Bread Flour or Better Batter.
- Xanthan Gum: This crucial ingredient helps give your bread that lovely structure. Omit it if your flour blend contains it.
- Instant Yeast: Quick and effective, instant yeast speeds up your rise time—just what you need!
- Cream of Tartar: Adds stability and height to your bread.
- Granulated Sugar and Kosher Salt: Both enhance the flavor and contribute to the perfect crust.
Optional Ingredients for Added Flavor and Nutrition
Want to elevate your gluten-free bread even further? Consider incorporating some optional ingredients:
- Flaxseed Meal or Chia Seeds: Great for an extra nutritional boost.
- Herbs or Spices: Think rosemary or garlic for a savory twist.
- Seeds: Sprinkle with toasted sesame or sunflower seeds for a delightful crunch.
These simple additions can make your homemade bread not only tastier but also more nutritious, reflecting your personal taste. Ready to get started? Let’s move on to the full recipe!
Step-by-step Preparation of Easy Gluten Free Bread
Making your own gluten free bread can seem daunting at first, but with this easy gluten free bread recipe, you'll find it's a straightforward process. Let's walk through it together!
Gather and measure your ingredients
To ensure your bread turns out perfect, start by gathering all your ingredients. Here's what you need:
- 3 cups (420 g) all purpose gluten free flour blend
- 3 teaspoons xanthan gum (omit if your blend already contains it)
- 2 ½ teaspoons (8 g) instant yeast
- ¼ teaspoon cream of tartar
- 2 tablespoons (25 g) granulated sugar
- 2 teaspoons (12 g) kosher salt
- 1 ½ cups (12 fluid ounces) warm milk (aim for about 95°F)
- 4 tablespoons (56 g) unsalted butter, melted and cooled
- 1 teaspoon apple cider vinegar
- 2 (50 g) egg whites, at room temperature
Using a digital kitchen scale can really enhance your accuracy! This is particularly important with gluten free baking, as precise measurements can make a world of difference.
Mix dry ingredients for perfect texture
In a large mixing bowl, combine the dry ingredients: your gluten free flour blend, xanthan gum, instant yeast, cream of tartar, and sugar. Whisk them together well, then add the salt, and whisk again. This step is crucial as it ensures that your bread has a uniform texture and flavor.
Combine wet ingredients to activate yeast
In another bowl, you’ll want to combine your warm milk, melted butter, apple cider vinegar, and egg whites. Make sure the milk is warm, as this activates the yeast! Add this mixture to your dry ingredients in the mixing bowl.
Blend everything into a smooth dough
Using a stand mixer fitted with a paddle attachment, mix your dough on low speed. You should scrape the sides to prevent any unmixed bits. After a few minutes, increase the speed to medium-high and mix for about three minutes. Your dough should be thick, smooth, and slightly whipped in texture.
Allow the dough to rise in a warm space
Once your dough is ready, scrape it into a greased loaf pan. Use a wet spatula to smooth the top. Cover with lightly oiled plastic wrap and let it rise in a warm place for about 30 to 45 minutes, or until it has increased by about 50%. Patience is key here!
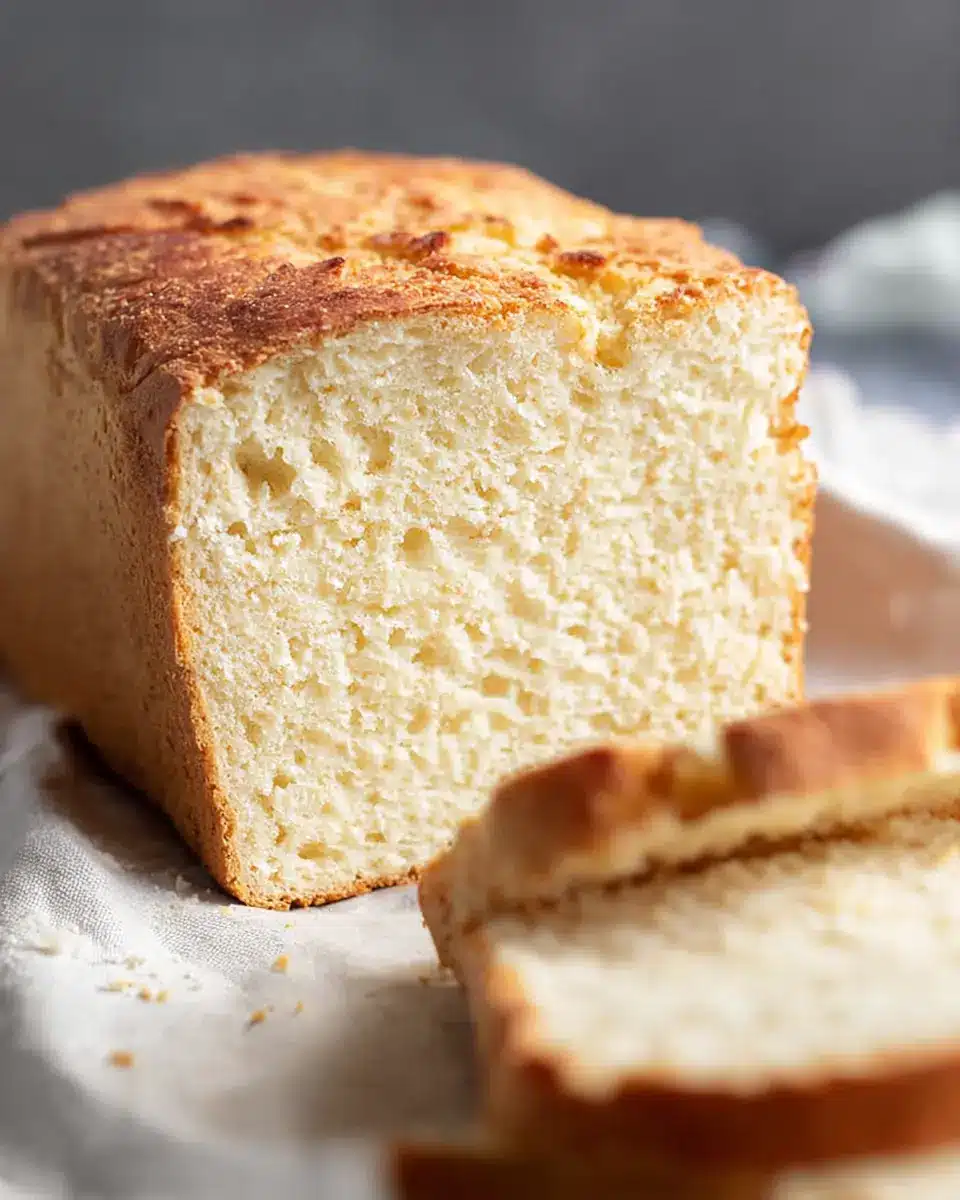
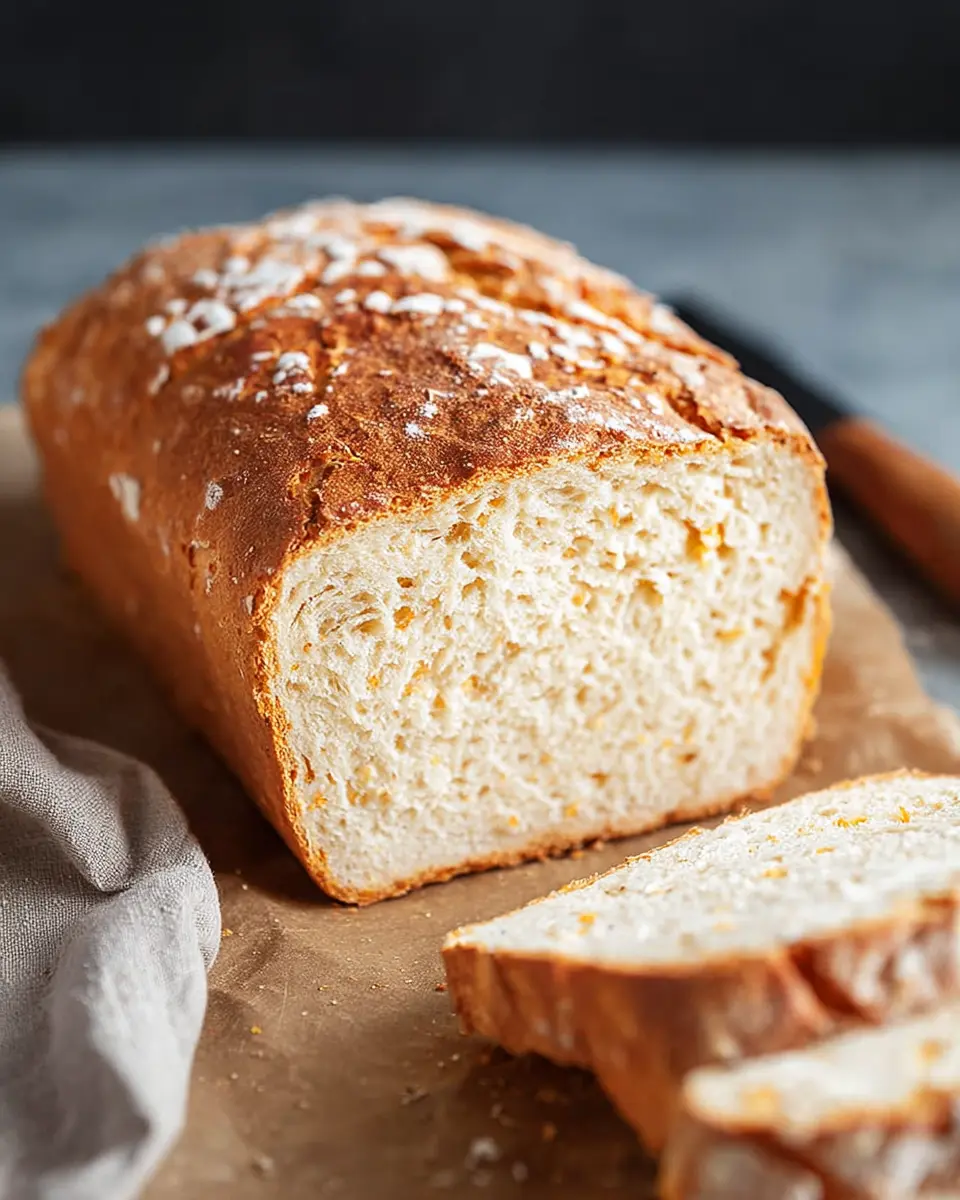
Bake the bread to golden perfection
Preheat your oven to 375°F. Once the dough has risen, it's time to bake! You’ll want to keep an eye on it for about 45 minutes to an hour. Test for doneness with a thermometer—the internal temperature should be around 205°F. Your loaf is done when it’s beautifully golden and makes a hollow sound when tapped.
Now you can enjoy your warm, homemade gluten free bread fresh out of the oven! Feel free to explore toppings and spreads to enhance your delicious creation. Happy baking!
Variations on Easy Gluten Free Bread
Add herbs for a savory twist
Elevate your easy gluten free bread recipe by incorporating fresh or dried herbs like rosemary, thyme, or oregano. Not only do they provide a delightful aroma, but they also bring depth to your bread’s flavor profile. To infuse the bread, simply mix in 1-2 tablespoons of your chosen herbs during the initial mixing phase. This variation is perfect for enjoying with soups or as a complementary side to a robust salad.
Sweeten the deal with honey or cinnamon
For a sweeter take, consider adding honey or cinnamon to your gluten free bread. Swapping the granulated sugar for 2 tablespoons of honey will yield a subtly sweet loaf that pairs beautifully with breakfast or afternoon tea. Alternatively, mix in 1 teaspoon of ground cinnamon for a hint of warmth. Imagine toasting a slice and topping it with your favorite nut butter or a smear of cream cheese—delicious!
Cooking Tips and Notes for Easy Gluten Free Bread
Troubleshooting Common Gluten-Free Baking Issues
Baking gluten-free bread can be a bit tricky, but don’t worry! If your bread doesn’t rise as expected, check the freshness of your yeast. If it appears dense, try increasing the warm milk slightly. For a crust that’s too hard, consider using a Pullman pan; this keeps the heat more evenly distributed. Always measure your flour by weight for accuracy, and don’t skip the xanthan gum unless your flour blend already contains it!
Time-Saving Tips for Busy Young Professionals
As a young professional, time is precious. For a quicker prep, measure out your ingredients the night before. Want to speed up the rising time? Turn on your oven to 200°F for a few minutes, then turn it off and place your dough inside to rise. This cozy environment can help your dough get fluffy in no time! Plus, batch baking a couple of loaves means you'll have meals ready to go throughout the week—it’s perfect for those busy days when you need a slice of easy gluten free bread on the fly! For more bread tips, check out the King Arthur Baking website for additional resources.
Serving Suggestions for Easy Gluten Free Bread
Creative ways to enjoy your homemade bread
Once your easy gluten free bread recipe is ready, the possibilities for enjoyment are endless! Try it toasted with a smear of almond butter and sliced bananas for a delightful breakfast. For lunch, transform it into a hearty sandwich with turkey bacon, fresh spinach, and a zesty mustard. You can even make savory garlic bread by topping slices with butter, minced garlic, and herbs before toasting.
Pairings that elevate the meal experience
To elevate your meals, consider pairing your gluten-free bread with:
- Soups: A comforting bowl of butternut squash soup complements the bread beautifully.
- Salads: Serve alongside a crisp side salad for a healthy, satisfying meal.
- Dips: Enjoy with your favorite hummus or a homemade avocado dip for a perfect snack.
These suggestions will make your nutritious bread not just a staple, but the star of your meals!
Time Breakdown for Easy Gluten Free Bread
Understanding the timeline for your easy gluten free bread recipe ensures a hassle-free baking experience. Here’s how it breaks down:
Preparation Time
15 minutes is all you need to gather your ingredients and mix them into that delightful dough.
Rising Time
Let your dough rise for about 1 hour, allowing it to become light and airy—this is where the magic begins!
Baking Time
Once your loaf has risen, it’ll bake for 45 minutes to 1 hour. Perfect your timing to achieve that golden crust.
Total Time
From start to finish, dedicate around 2 hours and 15 minutes. This includes prep, rise, and baking—totally worth the wait!
For a deep dive into the recipe, check out Nicole Hunn's Gluten Free on a Shoestring.
Nutritional Facts for Easy Gluten Free Bread
Calories per slice
Each slice of this easy gluten free bread recipe contains approximately 237 calories, making it a satisfying option for your meals or snacks.
Macronutrient breakdown
The slice is composed of:
- Carbohydrates: 39g
- Protein: 5g
- Fat: 6g (with 4g of saturated fat)
These figures provide a balanced macronutrient profile for a hearty gluten-free option.
Fiber content
With 3g of fiber per slice, this bread offers a delightful way to boost your daily intake, supporting digestion and keeping you feeling full.
For more in-depth information on gluten-free diets, check out resources like Healthline and Celiac Disease Foundation. Enjoy your healthy slice of homemade bread!
FAQs about Easy Gluten Free Bread
What type of gluten-free flour is best for this recipe?
For the easy gluten free bread recipe, a quality all-purpose gluten free flour blend is essential. Look for blends formulated for yeast bread, such as King Arthur Gluten-Free Bread Flour or Better Batter. Avoid using blends like Bob’s Red Mill 1-to-1 or Cup4Cup, as they may not provide the same texture or rise. For more options, check out my guide on all-purpose gluten free flour blends.
Can I make this bread dairy-free or egg-free?
Absolutely! To make this bread dairy-free, simply swap out regular milk for a non-dairy alternative such as almond or oat milk. For a dairy-free butter option, use brands like Melt or Miyoko’s. If you need to go egg-free, 50 grams of aquafaba or a commercial egg replacer works beautifully in this recipe.
How should I store leftovers for freshness?
To keep your easy gluten free bread fresh, wrap it tightly in plastic wrap and store at room temperature for up to two days. If you have extra slices, consider freezing them for longer storage. Simply wrap each slice individually and defrost as needed, popping them in the toaster for a quick treat!
Conclusion on Easy Gluten Free Bread
Making your own gluten free bread at home is incredibly rewarding. With just a few simple ingredients and a bit of patience, this easy gluten free bread recipe yields a delicious, soft loaf perfect for sandwiches or toast. Enjoy personalizing flavors and bringing healthy, homemade goodness to your table!
Why Making Gluten-Free Bread at Home is Rewarding
Baking gluten free bread yourself allows you to control the ingredients, ensuring your loaf is free from preservatives and additives. Here are a few encouraging reasons to give it a try:
- Customization: Experiment with different gluten free flours and add-ins like seeds or herbs for unique flavors.
- Freshness: Homemade bread is fresher and tastier than store-bought versions, often with a better texture.
- Cost-Effective: Save money by making your own, especially if you regularly consume gluten free products.
- Community and Sharing: Share your creation with friends and family, bringing everyone together over a delicious homemade treat.
Plus, there's something undeniably satisfying about pulling a warm loaf from the oven. Happy baking!
For even more tips and tricks on gluten free cooking, be sure to explore Nicole Hunn's website for a variety of recipes and resources!
Easy Gluten Free Bread Recipe
Equipment
- Stand mixer fitted with paddle attachment
- Digital kitchen scale
- instant-read thermometer
Ingredients
Dry Ingredients
- 3 cups all purpose gluten free flour blend (See Recipe Notes)
- 3 teaspoons xanthan gum omit if your blend already contains it
- 2.5 teaspoons instant yeast (See Recipe Notes)
- 0.25 teaspoon cream of tartar
- 2 tablespoons granulated sugar
- 2 teaspoons kosher salt
Wet Ingredients
- 1.5 cups warm milk (about 95°F)
- 4 tablespoons unsalted butter melted and cooled (plus more for brushing if using seeds)
- 1 teaspoon apple cider vinegar
- Toasted sesame seeds for sprinkling, optional
Instructions
Preparation
- Grease or line a 9-inch x 5-inch loaf pan and set it aside.
- In a stand mixer bowl, place flour blend, xanthan gum, yeast, cream of tartar, and sugar. Whisk with a handheld whisk. Add salt and whisk again.
- Add milk, butter, vinegar, and egg whites, and mix on low speed. Scrape down sides as necessary.
- Increase mixer speed to medium-high and mix for about 3 minutes until thick and smooth.
- Scrape the dough into the prepared pan and smooth the top with a wet spatula.
- Cover with lightly oiled plastic wrap and allow to rise in a warm place for 30 to 45 minutes.
- Preheat the oven to 375°F near the end of rising time.
- Remove the cover and optionally slash the top of the loaf. If using seeds, brush with melted butter and sprinkle them on top.
- Bake for 45 minutes to 1 hour; remove lid if using a Pullman pan after 40 minutes.
- Ensure the internal temperature reaches about 205°F, then allow to cool for 10 minutes before transferring to a rack.
- Slice into 10 equal slices when fully cooled.

Leave a Reply